Sunday, April 30, 2017

Burt's Bee Ultra Conditioning Lip Balm with Kokum Butter

Ultra Conditioning Lip Balm with Kokum Butter

Here is my review on Burts bee ultra hydrating lip conditioner (Kokum), pending since long time. To begin with, I did not buy this purposely. I was actually looking for Burt’s Bee original lip balm for quite a long time and was not able to find it in the store. Every time I visit, there were some with random fancy flavours. But because I was in desperate need, I bought this as I saw it is labelled ultra hydrating and has kokum butter in its ingredient list. Kokum butter is rich in essential fatty acids and has been traditionally used in India for dry skin issues. So, let’s see how the product performed on my expectation.
Burt's Bee Ultra Conditioning Lip Balm with Kokum Butter


Price: $ 4.98

Ingredients: 

cocos nucifera (coconut) oil, olea europaea (olive) fruit oil, helianthus annuus (sunflower) seed oil, helianthus annuus (sunflower) seed wax, persea gratissima (avocado) oil, olus (vegetable oil, huile vegetale), cera alba (beeswax, cire d'abeille), sclerocarya birrea seed oil, soybean glycerides, theobroma cacao (cocoa) seed butter, garcinia indica seed butter*, butyrospermum parkii (shea) butter, butyrospermum parkii (shea butter) unsaponifiables, cymbopogon martini oil, citrus aurantium dulcis (orange) oil, salvia sclarea (clary) oil, tocopherol, myroxylon pereirae (balsam peru) oil, vanilla planifolia fruit extract, illicium verum (anise) fruit/seed oil, cananga odorata flower oil, glycine soja (soybean) oil, citric acid, geraniol, linalool, benzyl benzoate. *Kokum Butter

What product claims:

Kiss dry lips goodbye. Clinically proven to offer 4 hours of long-lasting moisturisation, this ultra-hydrating lip conditioner is infused with rich Kokum, Shea, and Cocoa Butters. Giving you more butters and less wax than other balms, so your lips will be left soft and super smooth. It also lovingly replenishes your skin with no added flavors or fragrances. It’s hydration at its very highest.

Clinically proven to moisturise for 4 hours with 1 application
Hypo-allergenic with no added flavors or fragrances
Replenishes skin with Kokum, Cocoa and Shea Butters that melt on lips

My views you can use:

The consistency is very smooth, hydrating and buttery. Feels so perfect on skin. So far, of all my lip balms to tackle the winter woes, this gives the best light feel to the lips. I wanted to say good things but this lip balm is of no use. Within minutes of application it makes my lip drier and chapped. This has no staying power. Four hour moisturisation claim is false as you need to reapply it often. I still think Burt's Bee original lip balm is the best.

Overall score:💗❤❤❤❤

Friday, April 28, 2017

Xoxolat ~ For the love of chocolate Review

Xoxolat ~ For the love of chocolate Review

If pure cocoa is your love, grab your car keys and go visit Xoxolat in Vancouver. Because getting 100% pure cocoa is not an easy task. We went there for a chocolate tasting session. Well, I have seen many documentaries on youtube about cocoa so I already knew a lot about it. Still, it was interesting to get first hand information from informative and passionate people in the field of chocolate making.

We got to taste 100% pure cocoa and cocoa nibs from african as well as north american region. There were also chocolate flavoured with real cardamon, sea salt, lavender, toffee, peppers, chilli, chai, earl grey tea and milk. You can also find some crazy odd flavours like tortilla and beacon. In the end of the chocolate tasting session, you get a cup of warm chocolaty milk drink, which is so yum!😋. I wish the cup size was bigger and with it, its content too. 😂

You can buy pure, fair trade cocoa and chocolates. They have an extensive range of chocolates and flavours from around the globe. Apart from chocolate tasting sessions and selling chocolates, Xoxolat is also into chocolate making. You can buy Xoxolat brand chocolates from their store.

The chocolate price is mostly in the range of $6 -$13. Yes, some are pricey as compared to the other brands available outside. But, it is a small price you pay for the quality. Many reputed brands add low quality cocoa, soy lecithin, emulsifiers and sell as dark chocolate to lure cocoa lovers. At Xoxolat, you can find real 100% cocoa with only cocoa mass and cocoa butter, nothing else. They also sell cocoa nibs. An interesting thing about cocoa nibs is that surprisingly it taste less like cocoa or chocolate and more like almonds. Only after roasting, it gets that divine flavour of chocolate.

I bought European style drinking chocolate(double dark), a 100% cocoa chocolate bar and a pack of chocolates of different flavours. My only complain is that xoxolat European style double dark chocolate for drinking and it’s ingredient list was not mentioned on the jar. It only says 71%, organic and fair trade with no emulsifiers. I prefer brands which clearly convey information. I can assume that rest 29% is sugar but don’t leave it on my imagination. Because the absence of label raises my eyebrows and shakes say trust. Also, the drinking chocolate doesn't dissolve completely in milk. No matter how long I put it on heat. So, I put a cup of water on boil, add double dark chocolate and let it melt completely before adding milk. Like this, most if not all cocoa bits gets dissolved and you get a evenly mixed cocoa-milk drink.

Overall, it was fun-filled day and great experience. The associates at the store front were knowledgable, passionate and enthusiastic to answer our queries and talk about chocolates. Good experience is what we highly value in life and yes, it was worth visiting this place. Whether you are a chocolate lover or connoisseur, I am sure your love for chocolate will only amplify exponentially after the visit.

Here are the few clicks of the shop, its products and the stuff I bought.


An edible chocolate shoe for those who fantasise one! 


Magic pod ~ Cocoa bean & Xoxolat chocolates


Chocolates I bought
             
Flavours!


xoxo ~ For the love of my readers 😇
~Ren

Homemade Sour Cream Recipe

When I started making cheesecake, I didn't like using superstore's sour cream which is often loaded with guar gum, preservatives and modified food starch. So, I decided to make my own sour cream with just two ingredient - Heavy cream & Kefir.

I came up with this idea by understanding the sour cream's basic ingredients. A sour cream is meant to be sour and creamy, so kefir gives it sourness and heavy cream provides it the creaminess. I have successfully used this for baking cheesecakes and in linguine recipes. It tastes no less than supermarket's sour cream and it is of course healthy. Kefir is known for it's probiotic properties as it provides your system the goodness of good bacteria for your healthy gut.

Check how easy it is to make your own sour cream.

Recipe

1. Take one cup heavy cream and add a cup of milk to it. Mix well. 
2. Add organic kefir (buttermilk) or milk kefir grains. Mix well.
3. Incubate in cool and dry place away from direct sunlight for at least 30 hours.

The fermented sour cream can be filtered to remove water to get thicker consistency. However, I have used this sour cream in all my recipes and it turns out well. This can be covered and refrigerated for weeks.

~Ren

Thursday, April 27, 2017

Outbound Outdoor Camping/trekking Cook Set Review (6 pieces)

Summer is coming and everyone is busy buying camping stuff. We, being the first timer in the wild, cold zone for camping, are on our hunt to buy the best stuff based on others reviews for safe and comfortable camping experience.

After numerous rounds of Walmart, Canadian tire, Army and Navy, Coleman sites and other stores and online sites, we have finally zeroed in our camping utensil. Ah finally! It is called Outbound Stainless steel cook set (6 Pieces). And, we are glad to admit we are pretty happy with our decision.

Price - ~$54.49

Set contains - (Weigh - 990g / 2 lb)
  1. 2 Pot with lids (2.3 L &1.6 L)
  2. Frying pan (6 7/8” / 17.5 cm)
  3. 3 plastic cups (177ml/ 6 oz)
Lot of people prefer aluminium cook sets because they are light weight and easy to place in your backpack. However, I am fine with this extra weight of my cook set since, I have heard about aluminium toxicity.


Compact & Lightweight

Heat resistant handle can be pulled out when cooking


I will list why Outbound 6 pieces stainless steel cook set serves all the camping purpose :

  1. Compact packaging - Everything just fits into a round compact bag with occupies not much space considering it is 6 piece set. It also gives you choice to remove some item if you know you are not going to need so many stuff, further reducing weight and its space.
  2. Weight - Although it is made up of stainless steel it doesn’t weight much.(990g/ 2 lb)
  3. Design - The handles can be folded back on to the pots or pan, and when necessary while cooking can be pulled out to be used as handle. Handles are heat resistant.
  4. Copper Bottom - For even heat distribution.
  5. Easy to clean
  6. The set contain small pot to boil milk or water, big pot for making sauce, curry, etc and a pan which can be used for frying, or as skillet. Measurement cups come handy if you are finicky about measurements when it comes to cooking.
  7. Good to suffice the need of a family or group camping with friends
~Ren

Wednesday, April 26, 2017

Mushroom, spinach & artichoke linguine with grilled tomatoes & Brussels sprout (Mega Linguine)

Mushroom, spinach & artichoke linguine with grilled tomatoes & Brussels sprout (Mega Linguine)

I like my recipe grand, appetizing and healthy, all at the same time😋. So, I came up with this recipe ~ Mega Linguine. This has goodness of everything I like. If you dislike any of the grilled ingredient, you can absolutely skip it and yet, can expect it to be delectable.


Grill ingredients
Cut cherry tomatoes to grill
Artichoke heart

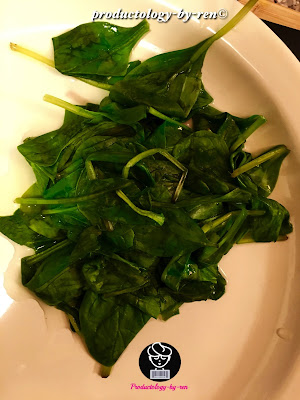
Blanched Spinach

Linguine cooked (al dente)
Grilled mix and garlic minced

Sour cream added

Mega Linguine

Servings (~ 3 Persons)

Prepare Linguine
Boil water till it starts bubbling. Add linguini and cook 8-9 minutes and strain the water.

Ingredients
  1. Cremini mushroom ( 1 Cup)
  2. Enoki mushroom (1 Cup )
  3. Baby Spinach blanched (1 Cup)
  4. Artichoke hearts cut into pieces Click to see how to cut and preserve artichoke hearts
  5. Cherry tomatoes (10)
  6. Brussels sprouts (3), each cut in 4 pieces
  7. Garlic (4)
  8. Shallots (1-2)
  9. Parmesan (1 Tablespoon)
  10. Avocado oil (2-3 tablespoon)
  11. Olive oil (1 tablespoon
  12. Sour cream (2 Tablespoon ) ~ Homemade (see recipe)
  13. Black pepper (2 teaspoon)
  14. Dry white wine(1 tablespoon)
  15. Salt (1 teaspoon)
  16. Rosemary (1 teaspoon)
  17. Basil(1 teaspoon)
  18. Oregano(1 teaspoon)
  19. Dry Parsley (2 teaspoon) or fresh (1 Tablespoon)
  20. Vinegar or lemon (1-2 tablespoon)
Steps

Preheat oven at 400℉
  1. Spray avocado oil and add herbs mix (black pepper, parsley, rosemary, basil, oregano, sea salt) before grilling. Grill Brussels sprouts, shallots, garlic, artichoke at 400℉ for ~20 minutes. Mushrooms and cherry tomatoes release water and hence should be grilled separately,
  2. Add vinegar and keep it aside.
  3. Add olive oil in a pan and minced grilled garlic, when warm.
  4. Add sour cream and wine. 
  5. Add blanched spinach and grilled mix.
  6. Mix well and add cooked linguine. 
  7. Cook for additional 2-3 minutes. 
  8. Add parmesan and give it a good mix. 

Mega Linguine is ready to be served! Put the grilled and caramelised shallots on the top.

~Ren

Monday, April 24, 2017

Broccoli soup recipe


Servings size (~3 person)

Ingredients:
  1. 1 Cup Broccoli florets
  2. 3-4 Enoki Mushroom
  3. 1 Shallot cut in large pieces
  4. 4-5 Garlic cloves (unpeeled and smashed )
  5. Basil (1 teaspoon)
  6. Parsley (1 teaspoon)
  7. 2 teaspoon of black pepper
  8. Croutons (optional)
  9. Salt as per taste
  10. Butter (1/2-1 inch)
  11. Avocado oil 2 tablespoon
  12. 2 Tablespoon Sour cream
  13. 1-2 Cup water
Preheat Oven at 400℉
  1. Place an aluminium foil on a baking tray and put broccoli, shallots, mushroom, garlic, parsley, basil, salt. 
  2. Spray avocado oil and bake at 400℉ for ~20 minutes.
  3. Once baked, put all ingredients in the blender and make a puree. Water can be added as per requirement,
  4. Melt butter in a pan and add the puree. 
  5. Add sour cream and cook till the puree boils.

Serve it hot with croutons!

~Ren


Sunday, April 23, 2017

Quick Tomato-cabbage soup recipe

Quick Tomato-cabbage soup recipe


Servings size (~ 3 person)

Ingredients:
  1. 1/2 Cup Cabbage
  2. 3 Tomatoes
  3. Dry Rosemary (1 teaspoon) or fresh 
  4. Basil (1 teaspoon)
  5. 1 Shallot cut in large pieces
  6. 4-5 Garlic cloves (unpeeled and smashed )
  7. 2 teaspoon of black pepper
  8. Salt as per taste
  9. Butter (1/2-1 inch)
  10. Olive oil 2 tablespoon
Steps: 

Preheat oven to 350 ℉
  1. Line bake tray with aluminium foil and put tomatoes, garlic, cabbage, onion, rosemary and basil on the tray.
  2. Bake at 350 ℉ for ~10 minutes or till tomatoes skin is wilted but nothing is burnt 😛 .
  3. Peel the skin of tomatoes, and add the pulp and all other ingredients in the blender. Add 1cup water to assist blending.
  4. Put butter in a pan and let it melt.
  5. Add the prepared puree. Water can be added to thin the puree. Let it cook till it starts boiling. 
  6. Add black pepper.

Soup is ready, serve it with garlic croutons.

Friday, April 21, 2017

Fried Rice Recipe (Indo-Chinese)

Fried Rice Recipe

Here is my Indo-Chinese version of fried rice. I have purposefully not given veggies amount because you can customise it as per your taste. Some people prefer more veggies (it’s me, I am talking about…hehe) while others prefer more rice.  

Hope you will enjoy reading and replicating !👍


Ingredients:
  1. Shredded cabbage
  2. Capsicum
  3. Carrot
  4. Moong beans
  5. White vinegar
  6. Soya sauce
  7. Sichuan pepper (optional - it add a unique flavour that gives tingling sensation)
  8. Black pepper
  9. Ginger, 1 stick
  10. Garlic, 1 minced
  11. 1 green chilli, Slit vertically
  12. Oil
  13. Salt as per taste
Prepare rice
Cook one cup of rice with 2 cup of water. 

Steps:
  1. Heat sesame oil in a pan, add green chilli, garlic and ginger. Cook on low flame till raw smell of garlic is gone.
  2. Add chopped vegetables and saute on medium to high flame. Stir continuously like a chef, flip and toss, have fun 😃
  3. Add vinegar, soya sauce, sichuan pepper, black pepper, salt, and cooked rice.
  4. Give it a good mix and cook for ~2 minute on low flame.

Fried rice is ready. Serve it with Schezwan chutney/sauce for ultimate flavour.

Also read - 
~Ren

Schezwan Chutney (Sauce) Recipe


Indo-Chinese dishes are incomplete without the flavour and spiciness of Schezwan chutney. It is a task to prepare but all the hard work is really worth the end result. But, taste wasn’t the reason why I was compelled to buy. The reason was the presence of artificial colours, preservatives and loads of chemical in schezwan sauce available in the market. Most of them have a unique aftertaste which I detest.

So I decided to go for homemade Schezwan chuntney. Trust me, once you taste the outcome of fruits of your labour, you will make it again and again, and will never buy one from the market.

This chutney can be used as dip or to turn leftover rice into a delicacy.

Schezwan Chutney


Ingredients


Ingredients:
  1. 10-15 Red chillies soaked in water for at least 30 minutes.
  2. Garlic cloves 10-15, minced 
  3. Ginger two sticks, minced
  4. 2 Shallots, chopped
  5. 1 Tablespoon white vinegar
  6. 1 Tablespoon Soya sauce
  7. 1/2 Teaspoon Sichuan pepper 
  8. 1/2 Teaspoon Black pepper
  9. 1 Teaspoon Brown sugar 
  10. 2 Tablespoon Sesame oil
  11. 1/2 Tablespoon of finely chopped cilantro stem (optional)
  12. Salt as per taste
Prepare Chilli paste:
Grind the soaked chilli with little water and keep it aside.

Steps:
  1. Heat sesame oil in a pan, add garlic and ginger. Cook on low flame till raw smell of garlic is gone.
  2. Add chopped onions and saute till soft and transparent.
  3. Add chilli paste, vinegar, soya sauce, sichuan pepper, black pepper, salt, brown sugar and cook till oil separates.
  4. Once done, let it cool and transfer it to the mason jar. Enjoy!

Note: You can add more oil to preserve it for long.

~Ren


Thursday, April 20, 2017

Spaghetti with Avocado sauce Recipe

Avocados are extremely nutritious. Unlike other fruits, it is rich in healthy fats and low in carbs. They provide wide range of vitamins including B complex, vitamin K, vitamin C and folate. The best part of it is that their delicious and creamy texture makes it suitable to use in many dishes including spaghetti. 

With parmesan

Without parmesan
Servings size (1 person)

Ingredients:
  1. 1 Cup Cooked (al dente) spaghetti
  2. 1 Cup chopped avocado
  3. 1/2 Cup baked broccoli
  4. 3 Tablespoon of olive oil
  5. 2 garlic cloves, minced
  6. 1 Tablespoon of chopped green onions (optional)
  7. 1/4 teaspoon parsley, cayenne pepper flakes
  8. 1 teaspoon of black pepper
  9. Parmesan cheese (1 tablespoon - optional )
  10. 1 Tablespoon lemon juice
  11. Salt as per taste
To cook Spaghetti

Boil water with a pinch of salt in a pot. When the water starts to bubbles, add spaghetti and cook for ~ 1-2 minutes (Time varies as per the brand used).

Avocado sauce recipe
  1. 1 Cup chopped avocado
  2. 1 Tablespoon lemon juice
  3. 2 Tablespoon olive oil
  4. 2  garlic cloves
  5. 1 Tablespoon of chopped green onions (optional)
  6. Salt (as per taste)
Blend all the above mentioned ingredients into fine puree.

Steps
  1. Heat extra virgin olive oil (1 Tablespoon) in a pan and add prepared avocado sauce and baked broccoli into the pan.
  2. If sauce is too thick, 1-2 tablespoon of water can be added. Let it cook for ~ 2 minutes on low flame.
  3. Toss the cooked spaghetti with the mix and let it cook for 1-2 minutes. 
  4. Add grated parmesan(optional), parsley, black pepper and cayenne pepper (optional). Spaghetti is ready to be served. Bon appetit!😊

~ Ren